Board modification of 8Bitmixtape NEO synthesizer
Buy Parts
| References | Qty | Description | Manufacturer | MPN | Digikey | Mouser |
|---|---|---|---|---|---|---|
| R1, R2 | 2 | 4.7K 1206 | Yageo | RC1206FR-074K7L | 311-4.70KFRCT-ND | 603-RC1206FR-074K7L |
| R3 - R6 | 5 | 22K 1206 | Yageo | RC1206FR-0722KL | 311-22.0KFRCT-ND | 603-RC1206FR-0722KL |
| R7, R8 | 2 | 470 1206 | Yageo | RC1206FR-07470RL | 311-470FRTR-ND | 603-RC1206FR-07470RL |
| R9, R10 | 2 | 1K 1206 | Yageo | RC1206FR-071KL (LED) | 311-1.00KFRCT-ND | 603-RC1206FR-071KL |
| C1 - C3 | 3 | 100nF 1206 | KEMET | C1206C104K5RACTU | 399-1249-2-ND | 80-C1206C104K5R |
| LED1, LED2 | 2 | Indicator LED's | Kingbright | AA3528SURSK | 754-1537-1-ND | 604-AA3528SURSK |
| NEO | 2 | SK6812 LED (Neopixel) | Adafruit | SK6812 | 1528-1104-ND | 485-1655 |
Neocococat
Board modification of 8Bitmixtape NEO synthesizer
Neocococat is a board variation from the 8Bitmixtape-NEO circuit and board. 8Bitmixtape is a DIY sound synthesizer electronic circuit using inexpensive and Arduino compatible Attiny85 chip, few very basic components and easy-to-use code uploader using audio jack instead of a USB interface. Please dive in to vast collection of info & material from the following link.
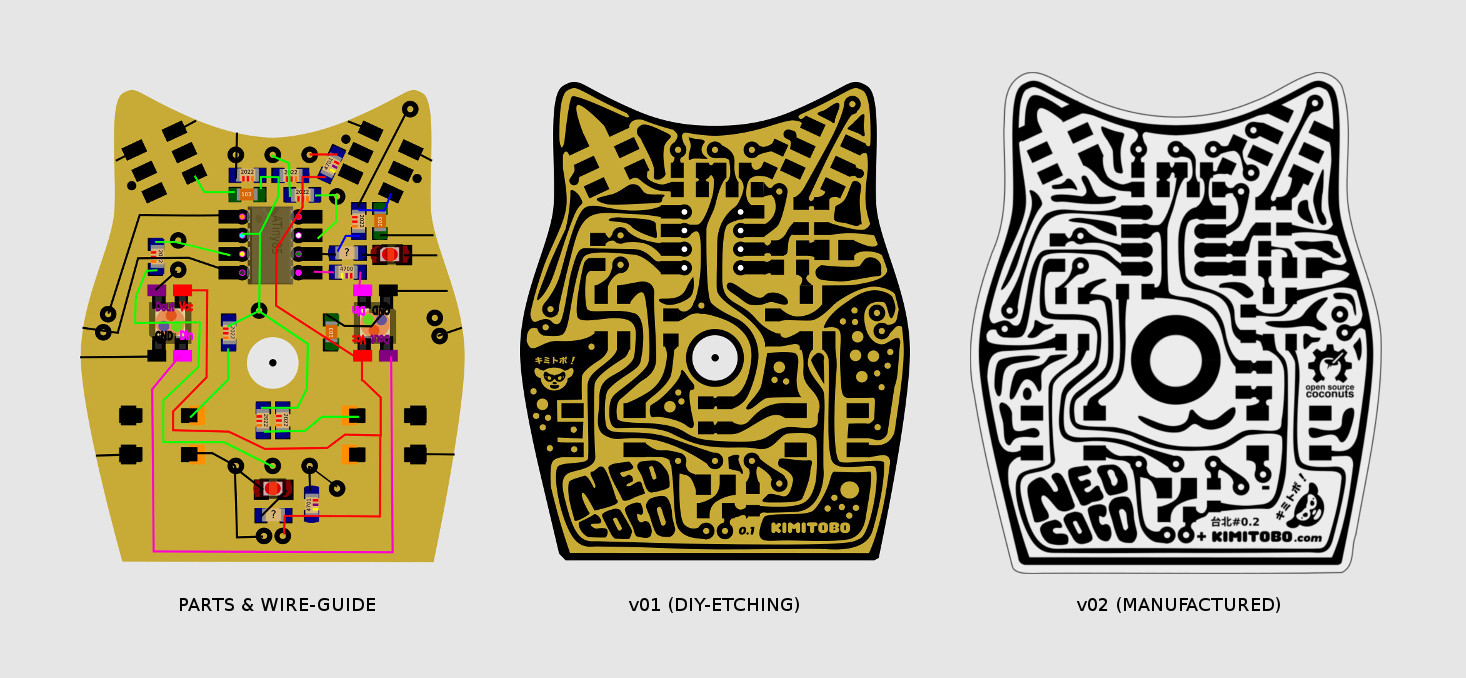
Neocococat was designed in Taipei, Dimensionplus April 2017, after Marc Dusseillers 8bitmixtape-NEO DIY pcb etching and (smd) soldering workshop. The circuit is almost identical to 8Bitmixtape-NEO, differences being: 1) only one potentiometer (place for the second pot with the resistors are included on the top of the board) and 2) two NEOpixels instead of 8 as the cat's eyes. All the 8Bitmixtapeneo code should be compatible. I hope I have a chance to contribute also some code derived from the vast collection of fantastic examples at some point. Feel free to copy, remix, do-what-ever-you-want with the board design. Open Source Hardware and coconuts :)
Following information is mainly notes-to-self, but hopefully develops to useful documentation for others.
V01 : DIY-pcb
Drawing the circuit in Inkscape

I started with Marc's DIYpcb workshop GärLämpli design assets, which are the used components with their footprings, scaled up to 400% for manual cut&paste circuit design with paper and pen. Instead of drawing by hand, I layed the components in 1:1 to inkscape and started to layout the parts according to the rough idea of the pot as cat's nose, NEOpixels as her eyes, ATtiny as the "brains" and rest around as compact circuit as possible. After the components were roughly in place, I draw the logic lines (nets?) with colour-coded lines for Vcc, Gnd, and signals. After this, I started to draw the copper paths with bezier curves, keeping it organic and trying to include some features of cat's head. But it got pretty corwded and eventually the confined small space dicated the freestylin' quite a bit.
PCB etching
The copper design was printed with an office laser printer according to what we learned in Marc's workshop and cut out the paper, oiled it (for more translucency in the following exposure), cut piece of ready-to-expose copper PCB, exposed it with Marc's DIY blue-led exposing-station (mirror the image!), spoiled (overexposed) the first trial, doubled the oily paper for better black, exposed for 45sec (do a test exposure), developed the board in 30 degree celcius sodium hydrokside (NAOH) solution until the unexposed part got fixed (rub gently the exposed parts with some gloves) and finally etched the board in +50 degrees celcius sodium peroxodisulfate solution for half an hour or so, until the exposed copper was dissolved (keep it hot, we used larger hot water bath for the etching tray, speeds the process a lot). Finally, the greenish layer of protective coating over the copper design was rubbed away with acetone and the remainings of some dust and garbage copper residue was sanded away.
Soldering
Solder the small SMD components first. Especially audio plugs the IC socket and the Pot are so close to resistor and capacitor pads that they should all be in place before soldering the larger components. The (one-sided) board is stable to tape on the table before soldering the power socket and pot. I recommend two intermediate tests while in between the soldering: power circuit + audio code upload and button check.
V02 : Manufactured board
Kicad
After few modification to the Inkscape design, namely bit more room to the pot in the middle and some extra pads for the flipside, the png files were imported to kicad using thehe "logo" method (instead of drawing the board using Kicad schematic & board designer.) This is bit cumbersome process and I will link to some guidelines here later.
PCBway
Gerber files were imported from Kicad and zipped and sent to PCBway in Shenzhen for express manufacturing. The 24h option was not available for some reason, so we selected 48h for set of 50 boards, gold immersion on white. 48h + one day for the shipping, a guy with a scooter delivered the boards on Saturday morning. The speed of getting things done in this corner of world is pretty impressive.
Acknowledgements
This was a learning excercise for DIY board making more than a product design excercise. The shape of the cat's head is a small tribute to my previous visit to Taipei & Dimensionplus for Lemonster workshop in 2015. Big thanks for Marc Dusseiller for very inspiring facilitation and geeking company, and for Escher Tsai and whole Dimensionplus team for heartwarming hosting and hospitality.